The Best Way to Do Code Review on Bitbucket (With Pipelines, PR Tips & Real Examples)
AI CODE REVIEW
Aug 9, 2025

Introduction: Code Reviews Deserve Better
Code reviews aren’t blockers.
They’re where real engineering happens.
The place where bugs get caught before they break things.
Where unclear ideas get shaped into shared understanding.
Where junior devs learn, and senior devs align.
But too often, PRs feel like a chore - noisy, rushed, and filled with vague comments or silence.
They get treated as just “something to get approved”, instead of what they actually are:
A conversation. A checkpoint. A moment to slow down and sharpen up.
Bitbucket gives us a solid review system - and in this guide, we’ll show you how to make the most of it.
What you’ll get:
A practical, step-by-step framework for better PRs in Bitbucket
Real-world review habits (that work across all experience levels)
Built-in ways to automate the basics and focus on what matters
A live demo repo you can use to try this process yourself
Whether you’re a junior just starting out or a tech lead managing reviews every day - this guide is for you.
What Makes a Great Code Review (Even in the Age of AI)
You don’t need to catch every typo.
You need to protect the system, help the person, and leave the code better than it was.
That’s what a great code review does.
Even with automation handling tests, scans, and style checks, good reviews still depend on thoughtful decisions and clear communication.
A good reviewer doesn’t just ask “Does it work?”
They ask:
“Will this confuse someone later?”
“Could this break in a real-world edge case?”
“Is this the simplest way to say what the code’s trying to do?”
Great reviews do three things:
🐛 Prevent issues before they make it to testing
✍️ Teach patterns and clean design
🧠 Build clarity across the team - even for people not in the room
The best code reviews are less about ‘does it work?’ and more about ‘will this be understandable in six months?’
What a Bitbucket PR Really Is (It’s Not Just “GitHub but Different”)
In GitHub, you open a Pull Request to propose changes.
In GitLab, it’s called a Merge Request.
In Bitbucket, it’s still a Pull Request - but the way it’s structured changes how teams review.
A Bitbucket PR isn’t just a way to merge code.
It’s a space for collaboration, context, and confidence - built right into the workflow.
Inside every Bitbucket PR, you get:
A clean layout to explain what the change does and why it matters
A place to assign reviewers and track their approvals
Built-in CI/CD integration via Bitbucket Pipelines
Native Jira linking (if your team uses it)
Tasks, comments, and commits - all threaded into a single view
What makes it different from a GitLab MR isn’t the features - it’s the feel.
GitLab MRs often lean heavier: multiple tabs, deeply integrated project layers, extra review tooling.
Bitbucket PRs are more focused.
They keep the review flow tight and actionable - without losing any of the essentials.
It’s the difference between a review system and a review workspace.
And that’s exactly how we’ll use it in this guide - to focus on what matters, without getting lost in tabs and config.
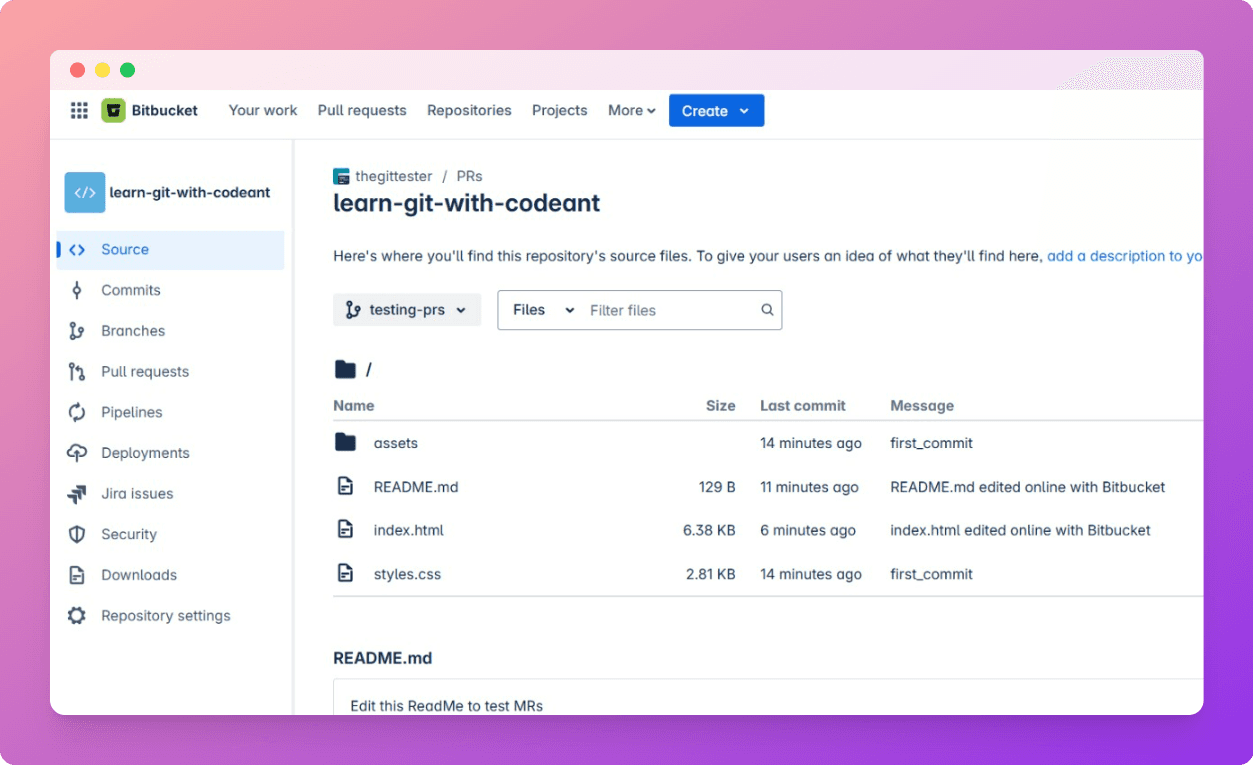
Try it for yourself: Fork our https://bitbucket.org/git-guide/learn-git-with-codeant, make a small edit, and raise your own PR. We’ll walk you through every step next.
Before You Even Open That PR: Self-Review First
Before your reviewers see the code, you should see it first. Properly.
Not as the person who just wrote it.
But as someone reading it fresh.
Someone asking:
Does this make sense?
Is this clean?
Would I want to review this?
Because once you raise that PR, you’re asking for time. For focus. For attention.
So do your part before you hit “Create”.
Quick Self-Review Checklist
Reread every line. (yes, every single one)
Tests updated or written - and passing.
Debug logs, comments, and TODOs removed.
Commit messages are clean and specific.
Scope is tight - one fix or feature per PR.
You’d be comfortable explaining the change on a call.
“Good PRs save your team time. Great PRs also make you proud.”
This is the part no tool can fully do for you.
It’s not about being perfect - it’s about being considerate.
The better shape your PR is in when it arrives, the better feedback you’ll get back.
Creating the Perfect Bitbucket PR
A great PR doesn’t just contain clean code - it creates clarity for the person reviewing it.
In this section, we’ll walk you through how to open a pull request in Bitbucket, step by step. You can follow along in real time using our demo repo.
Try each step as you read - you’ll get to raise a real PR with the right habits in place from the start.
Step 1: Branch or Fork?
This depends on where you’re contributing:
If you're working in a team-owned Bitbucket repo (e.g., company project)
→ Create a new branch directly in the same repo.If you’re contributing to a public repo you don’t have write access to (like this one)
→ Fork the repo first - Bitbucket supports this just like GitHub or GitLab.
To fork:
Click the 3 dots next to “Clone” → Fork
Later, create a new branch for your change inside that fork (don’t edit directly on
main)
Step 2: Make Your Changes
Now that you’ve forked and branched:
Commit your edits with clear messages.
If you're working locally, push them using Git.
Or use Bitbucket’s in-browser editor (simpler, but works for small tweaks).
⚠️ Don’t push directly to main or master. Always use a separate branch - safer, cleaner, easier to roll back.
If you’re using the in-browser editor, tick on the “Open a PR” while committing - then name the new branch. Put all additional changes inside this branch. You should ideally decline this PR afterwards, as you needed the code to only be present in the new branch anyway.
Step 3: Start the Pull Request
Go to your fork - the one where you just committed changes.
In the sidebar, click Pull requests.
In the top-right corner, click “Create pull request”.
If the button is disabled, make sure:
You’re in your fork (not the original repo).
You’ve committed your changes to a new branch.

Step 4: Select the Right Source and Destination
You’ll now choose:
Source repo → your fork
Source branch → the branch with your change
Destination repo → original repo (the one you’re contributing to)
Destination branch → usually
main
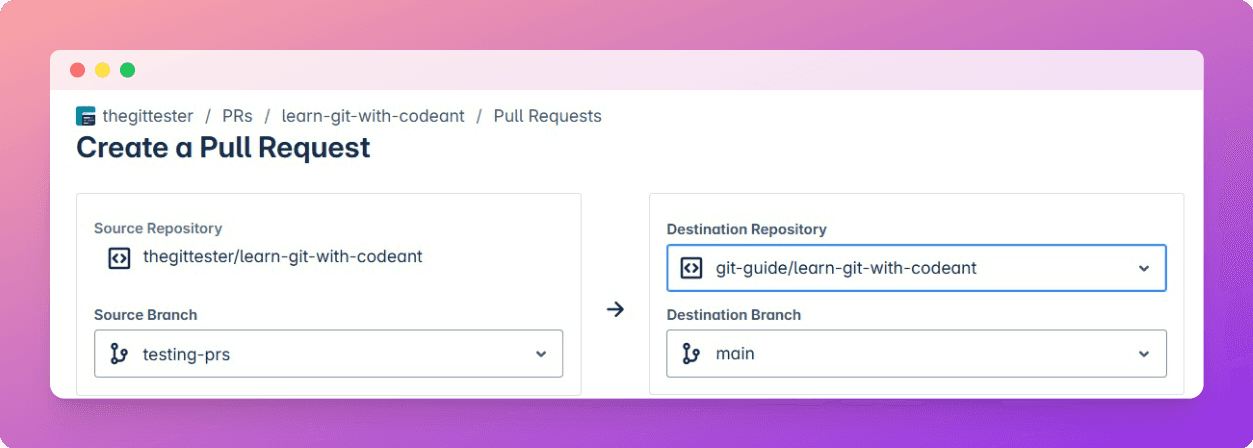
Be careful here. Double-check you're not accidentally targeting the wrong repo or pushing to your own fork’s main.
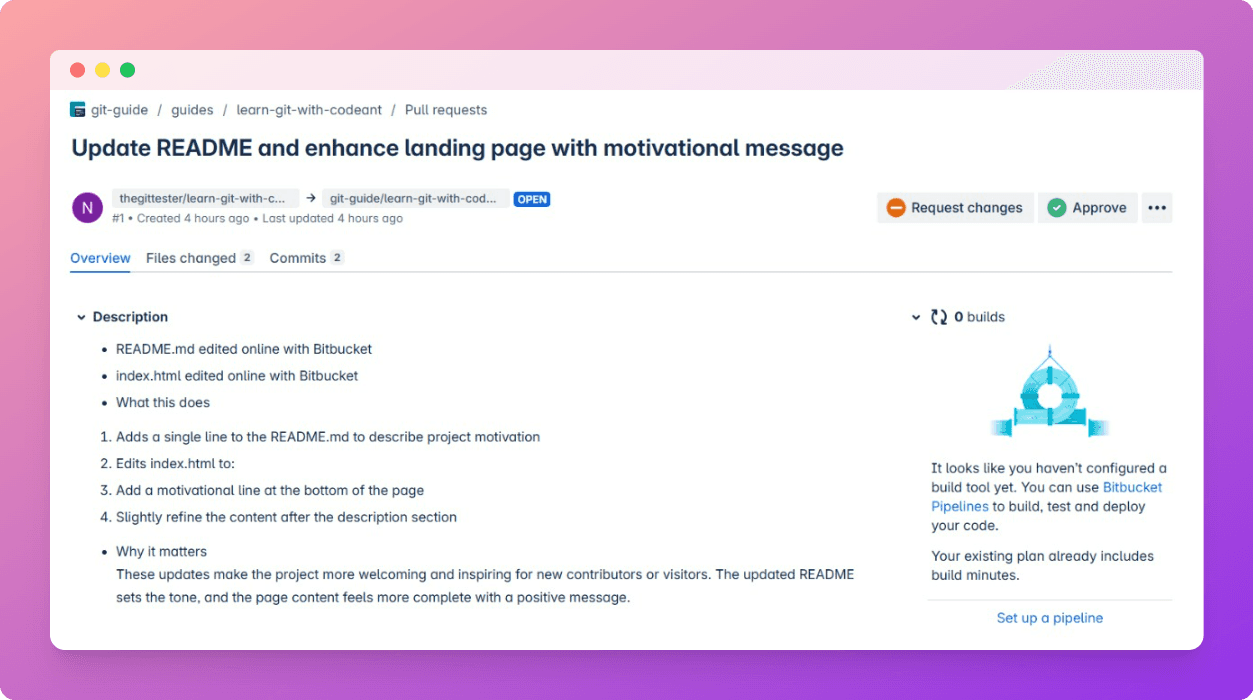
Step 5: Add a Solid Title and Description
This is where your reviewers get context.
Title → one line that clearly says what’s being changed
Description → focus on the why, not just the what
Stick to a standard format if you can:
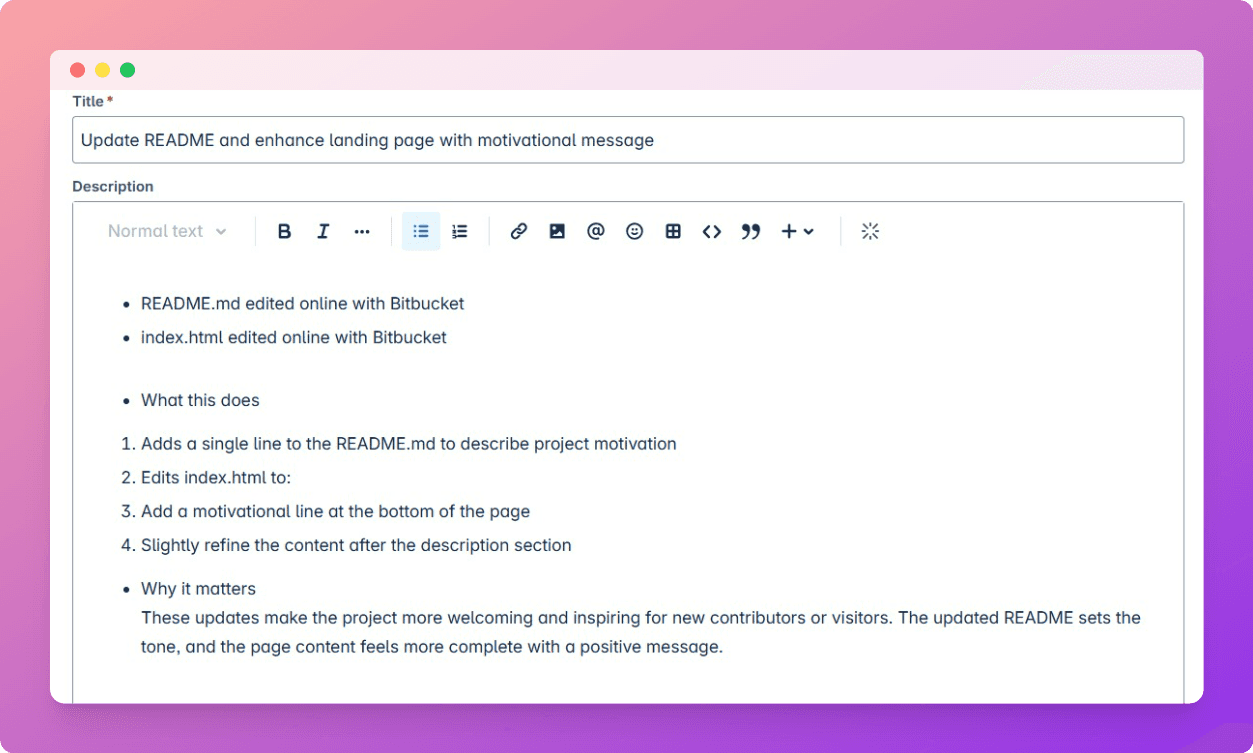
This is one of the most important parts of the review experience. Be generous with clarity.
Step 6: Assign Reviewers (if needed)
If the repo is public, you can tag anyone as a reviewer.
If it’s private, you’ll only see collaborators with access.
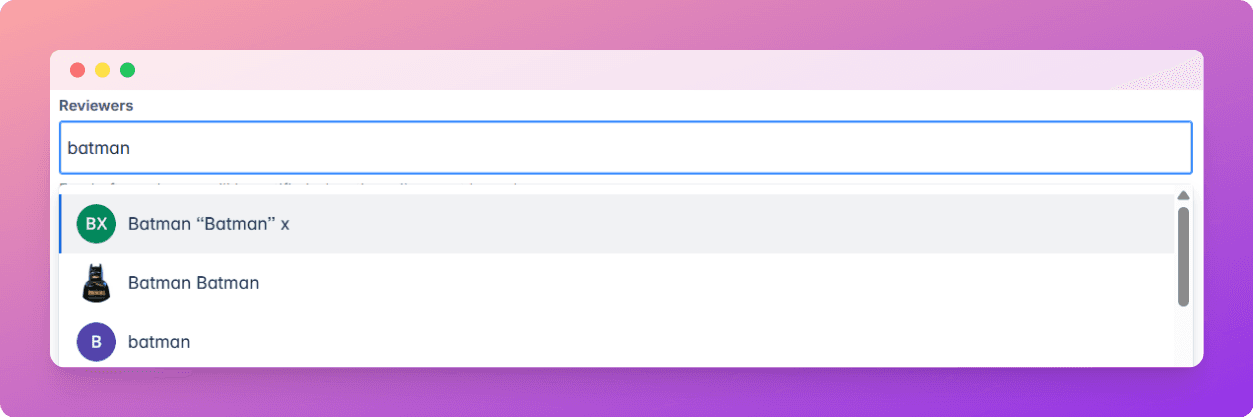
Good reviewers = people who know the context, not just who’s online.
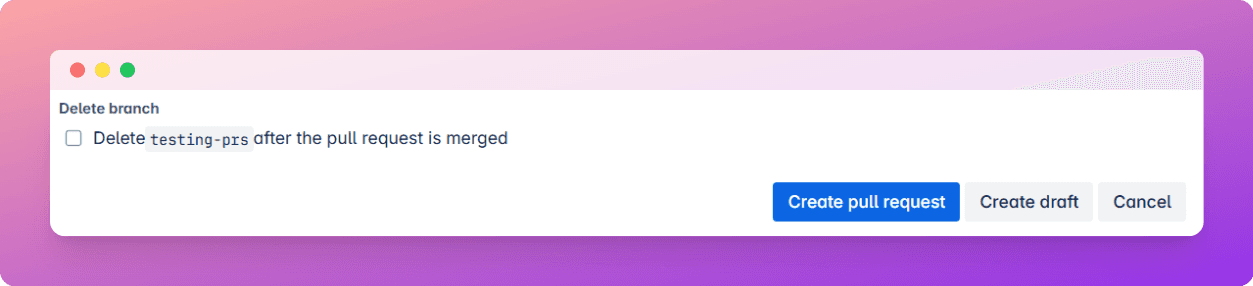
Step 7: Enable “Delete Branch After Merge”
Check the box:
✅ “Delete your-feature-branch after the pull request is merged”
It’s a good practice that keeps your branch list clean.
Step 8: Review the PR Before You Submit
Scroll through:
Commits at the bottom
Changed files and line-by-line diffs below that
The sidebar will show file count and total lines added/removed
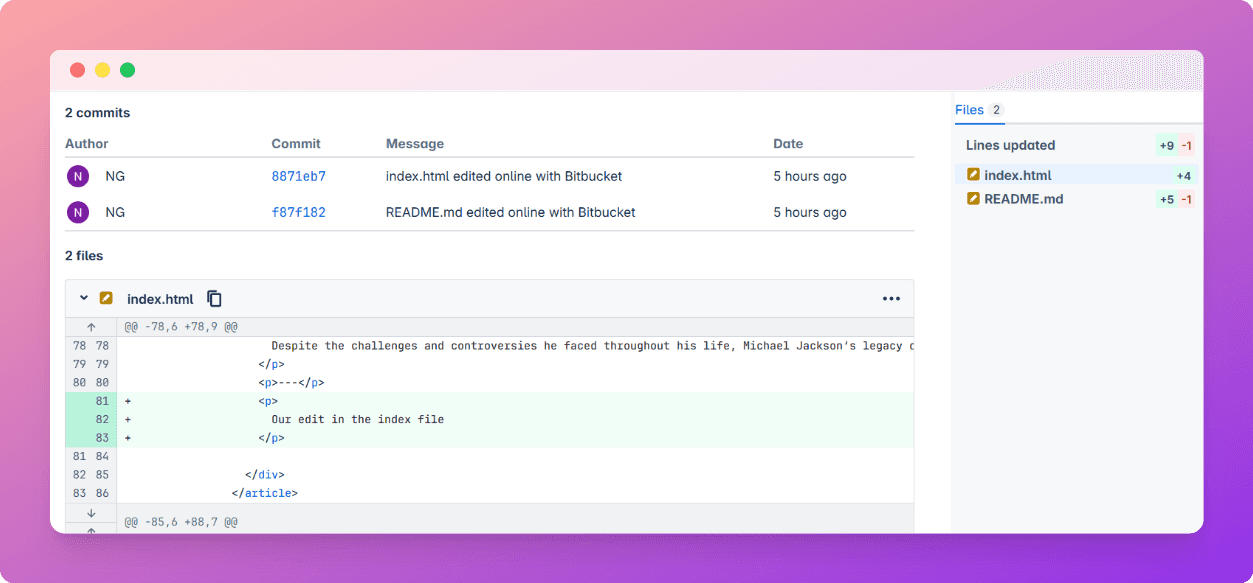
Think of this as your reviewer’s preview. Give it one last check - remove noisy edits, logs, commented code.
Final Step: Create or Draft
Ready for full review? → Hit Create pull request
Still polishing or want early eyes? → Hit Create draft
A well-prepared PR makes everything smoother - for you and your team.
Reviewing the PR: How to Actually Help
Opening a PR is half the job.
The other half - reviewing it well - is what keeps your codebase healthy, your team aligned, and your tech debt from snowballing.
And reviewing well doesn’t mean nitpicking every console.log.
It means giving thoughtful, focused feedback that improves the change and the developer behind it.
Navigating the PR Section
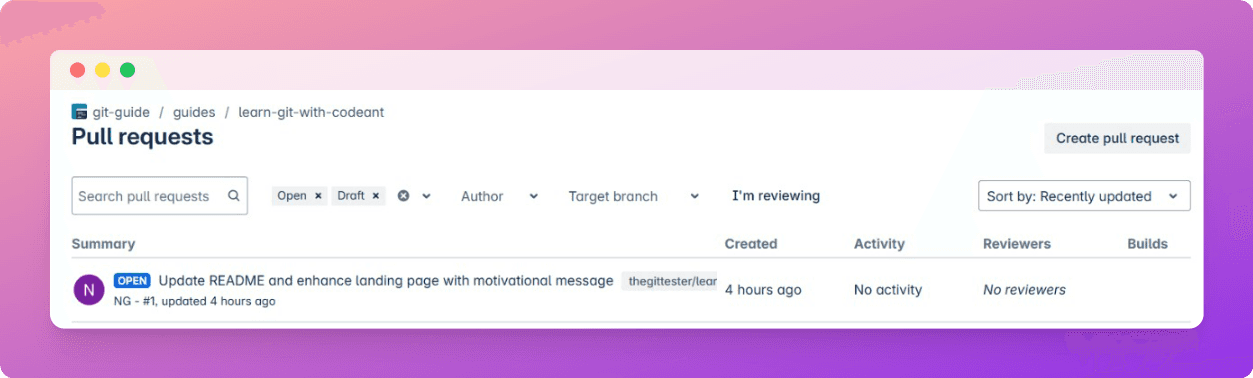
To view PRs in Bitbucket:
Click the “Pull requests” button in the sidebar
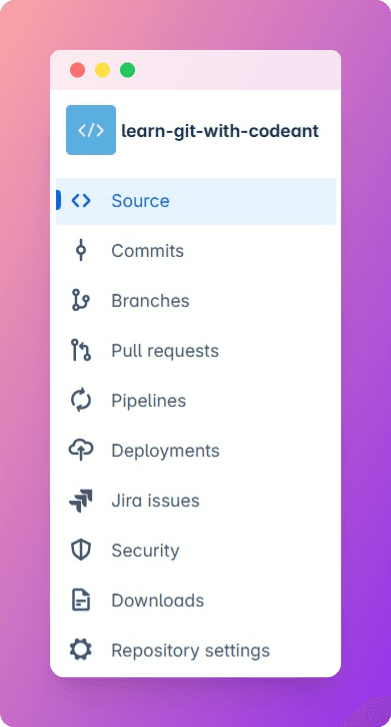
Unlike GitLab or GitHub, Bitbucket won’t show the number of open PRs - you’ll need to open the section to check.
Inside the PR tab, you can:
Filter by status (open, draft, merged, declined)
Search by author or target branch
To view only the PRs you're reviewing, click “I’m reviewing”
Opening the PR
Once inside a PR:
Read the title and description carefully
Understand the why behind the change before judging the how
At the bottom, check the comments and activity feed
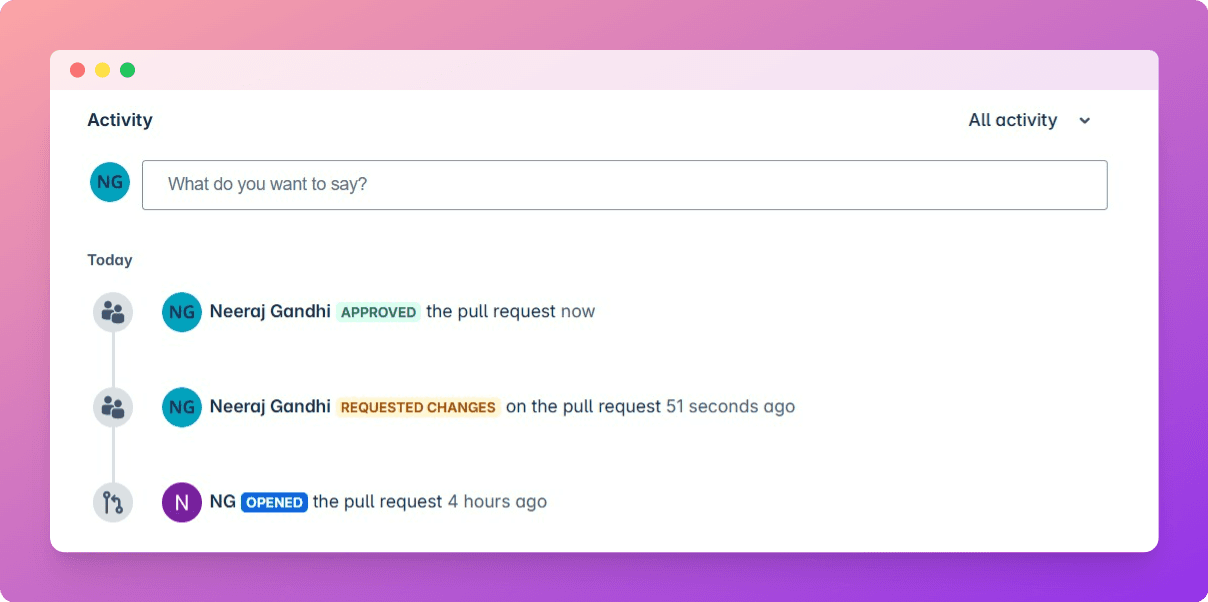
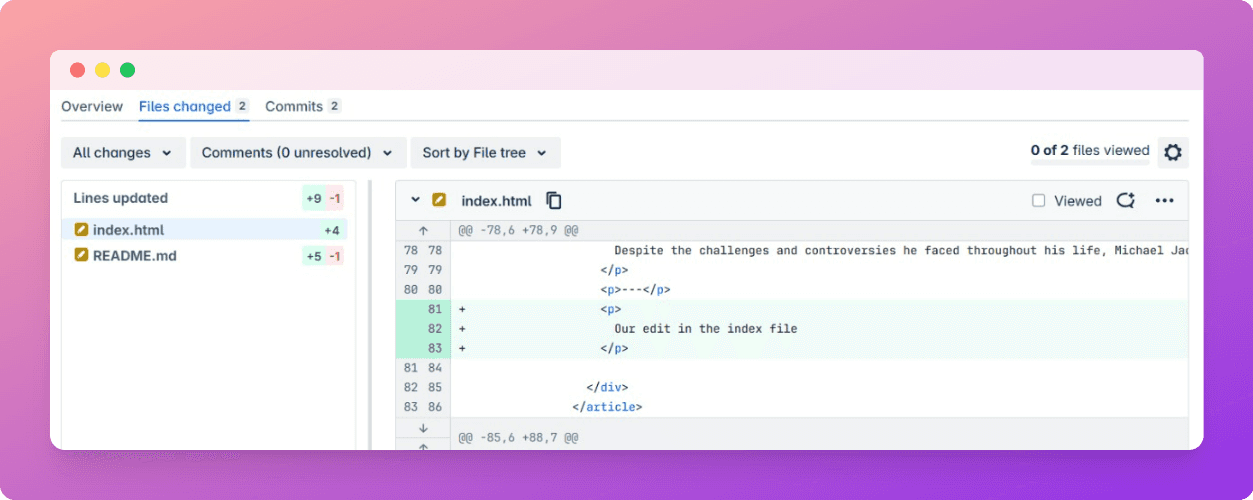
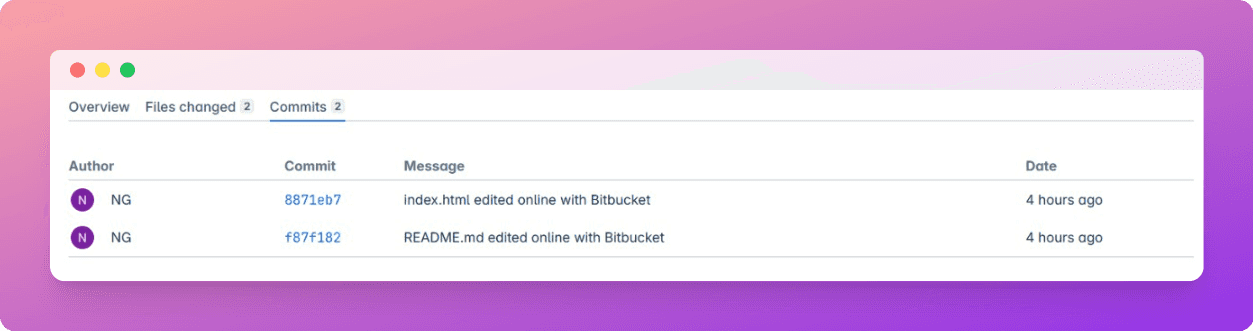
Then switch tabs to:
Files changed → for the actual review
Commits → helpful for following change history
Use the Sidebar Wisely
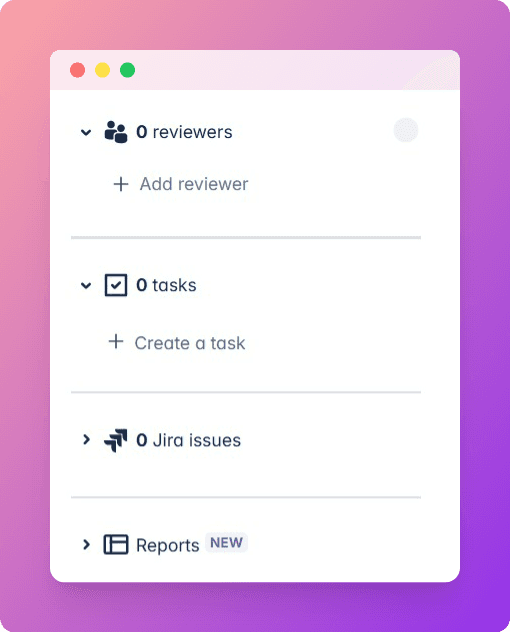
On the right-hand sidebar:
Reviewers → See who’s assigned. You can edit this list and add/remove reviewers.
Tasks →Action items flagged during review. These can be created from comments or added manually.
Jira Issues → Linked automatically (if integrated)
Reports → Warnings, test coverage, or static analysis results (if configured)
You'll also see:
Builds and Checks → CI/CD status from Bitbucket Pipelines
We’ll dive deeper into these later in the blog.
Review Buttons and Options

At the top right:
Approve → If the change is ready.
Request changes → If something must be addressed.
Unapprove → Roll back your approval if something new shows up.
Click the three dots for more options:
Merge → If you’re permitted
Mark as draft → If it’s not ready yet
Decline → Permanently close the PR
Watch → Stay notified
Open in VS Code → Review with full dev tooling
What Makes a Good Code Review?
You’re not here to nitpick. You’re here to clarify, protect, and improve - the code and the culture.
What to focus on:
Logic and correctness
→ Does it actually work? Does it handle edge cases?Security assumptions
→ Any unsafe patterns or unchecked input?Naming and structure
→ Will this be clear to someone new on the team?Side effects and performance
→ Does it quietly break or slow down anything?Style (if impactful)
→ Don't block over preferences - unless it affects clarity.
Commenting: Make Suggestions, Not Confusion
Avoid vague feedback. Say what you mean - and say why.
Use prefixes to help tone and structure:
suggestion:- Here’s a better/clearer wayquestion:- Why did we choose this?issue:- This needs to changenitpick:- Totally optional, but maybe this reads better
In the Files changed view, you can also:
Leave line-by-line comments
Click the chat bubble with the
<>icon or type/suggest
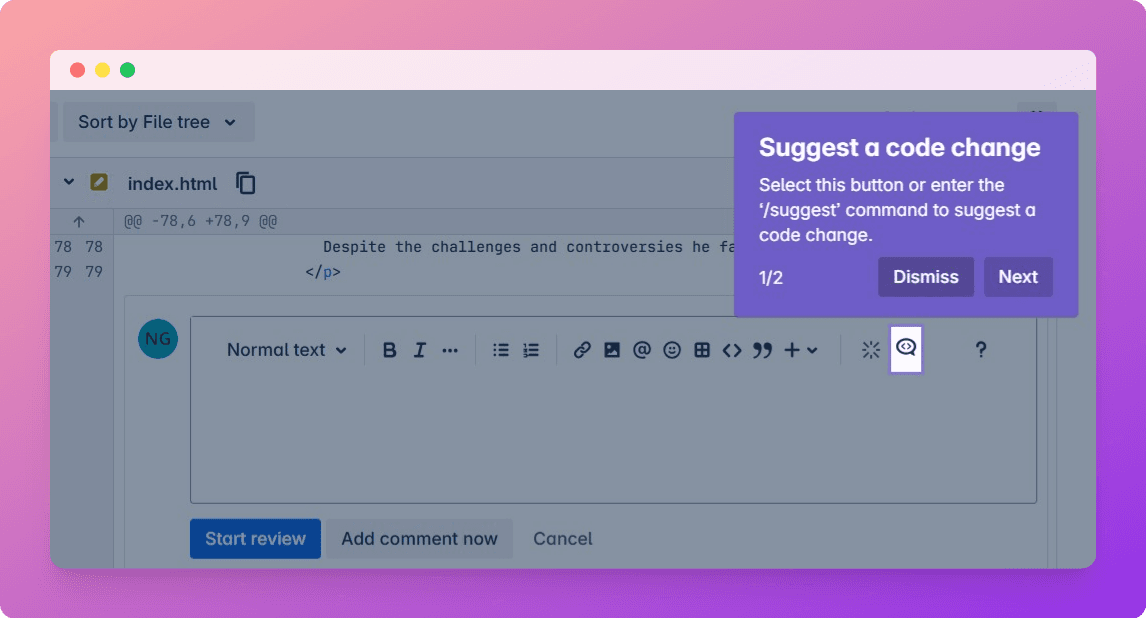
This lets you propose a new line directly - and the author can accept it with one click.
Use “Start review” → “Finish review” to batch your comments instead of spamming notifications.
If something needs action, turn the comment into a task. Tasks appear in the sidebar and can’t be marked resolved until addressed.
You can also edit or resolve your own tasks - or even assign one to someone else.
Best Practices for Reviewers
Start with the PR description, not the diff
Prioritise impact - focus on logic, structure, and clarity
Be kind, not soft - clarity matters more than ego
Ask before assuming - some decisions have context you won’t see
Only approve when you genuinely believe the PR is good to go
Great reviews don’t just protect code. They build trust.
Assigning Reviewers and Structuring Approvals
Who you assign matters just as much as what you wrote.
A thoughtful reviewer can help you spot bugs, simplify code, or avoid future rework. A random reviewer? They might just skim and approve without context.
So don’t treat reviewer assignment like an afterthought. It’s a core part of making your PR successful.
Good Practices:
Use Bitbucket’s default reviewers
Set them in repo settings so key people are automatically added to relevant PRs.
It saves time and keeps reviews consistent.Rotate reviewers when you can
It spreads knowledge across the team and avoids review fatigue.Assign people who can contribute, not just approve
“Don’t just assign who’s free - assign who can meaningfully contribute.”
Set up Merge Checks (And Actually Enforce Them)
Bitbucket lets you enforce rules before a PR can be merged - and this is where code review hygiene gets real.
It’s not about policing your team.
It’s about building consistency, especially when you're moving fast or working in a larger repo.
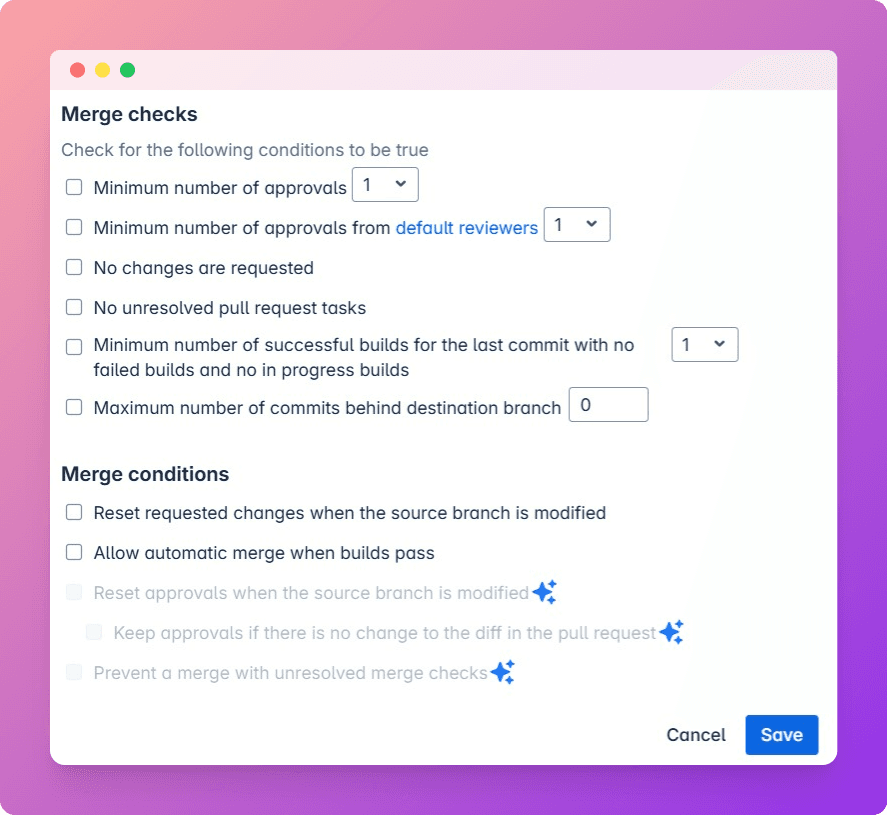
Recommended Merge Checks:
Minimum 1–2 approvals
No unresolved tasks
All CI checks pass (lint, tests, etc.)
No changes requested from reviewers
Prevent merging if PR is too far behind the destination branch
How to Set This Up
You can configure all this from your repository settings.
Go to Repository settings → Branch restrictions
Click “Add branch restriction”
Here, you can:
Choose specific branches (like
main,dev)Or apply rules to patterns (like
release/*orfeature/*)Or use branch types (predefined categories)
You’ll see two sections:
1. Branch permissions
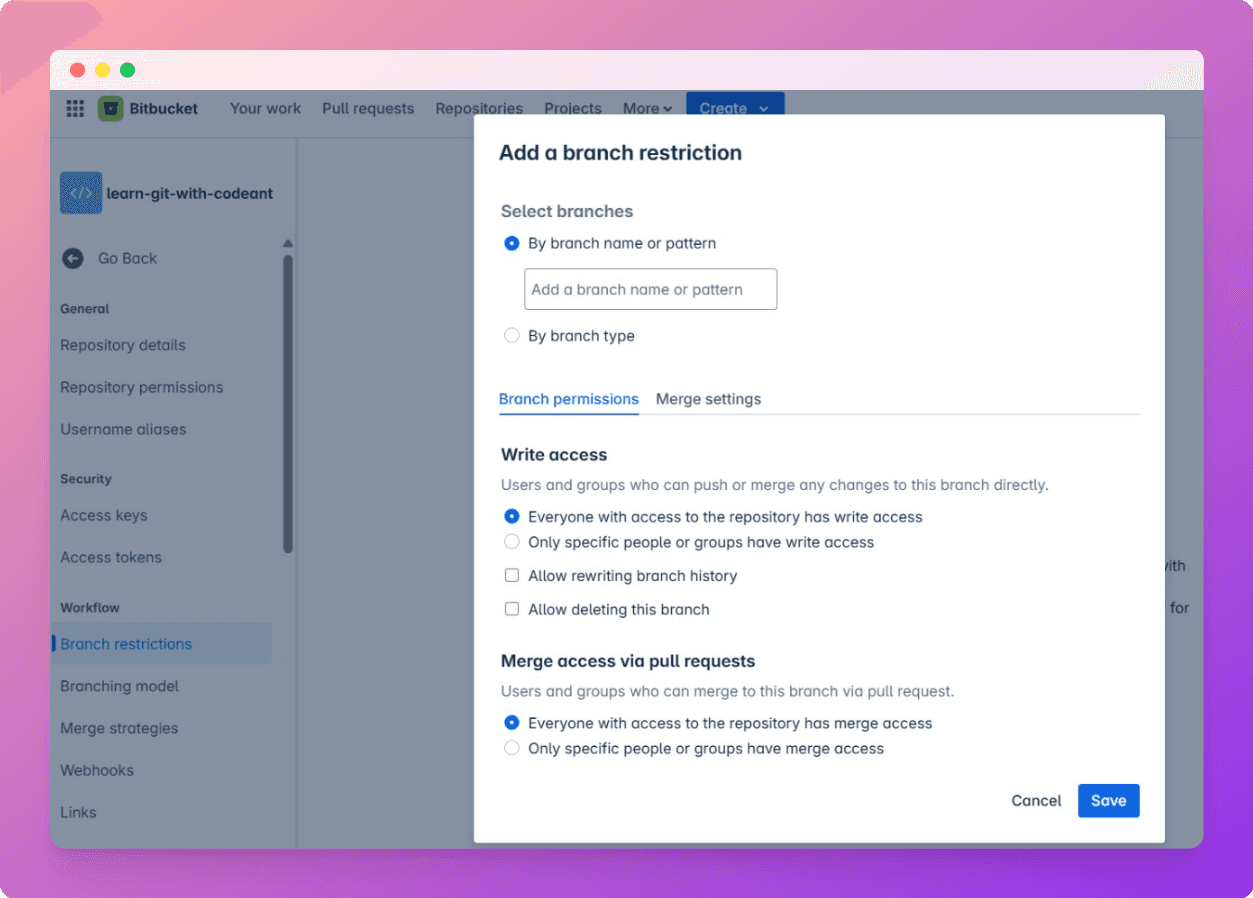
Control who can write or merge directly into the branch
Usually paired with PR-only workflows (no direct commits)
2. Merge settings
This is where the real control happens.
Toggle merge checks like:
Minimum number of approvals (e.g., 1–2)
Minimum from default reviewers (optional, but useful)
No unresolved pull request tasks
All CI builds pass for the latest commit
No requested changes pending
Block if the branch is behind the destination
Pro tip: You can mix and match - strict for main, relaxed for dev.
Once this is set up, Bitbucket will block the merge button if these conditions aren’t met.
It’s a small effort with big payoffs for review quality and team trust.
Bonus: Auto-assign using CODEOWNERS
You can also define a .bitbucket/CODEOWNERS file.
This maps certain files or folders to specific reviewers - so people get auto-tagged based on what changed.
Example:
It’s a simple way to make reviews faster, fairer, and smarter.
Keep PRs Small: The Science of Better Review Velocity
If there’s one thing that improves code reviews instantly, it’s keeping PRs small.
Big PRs scare people off.
They’re harder to understand, tougher to review, and much easier to ignore.
Aim for:
Under 200–300 lines changed
One fix or feature per PR
No mixed cleanups, refactors, and new logic all in one
Why smaller PRs work better:
They get reviewed faster
They lead to clearer, more focused feedback
They reduce merge conflicts and rework
They help reviewers actually understand what changed
If it feels too big, it is. Split it.
Even if it takes an extra few minutes to break things up, your teammates (and your future self) will thank you.
Let Bitbucket Pipelines Do the Heavy Lifting
Code reviews should focus on logic, clarity, and architecture - not on broken builds or missed semicolons.
That’s why Bitbucket Pipelines are a game-changer.
They let you run automated checks every time code is pushed or a PR is opened - so your reviewers see only what’s worth reviewing.
What Can Pipelines Automatically Do?
Once set up, Bitbucket Pipelines can run checks like:
Linting
Run tools like eslint, prettier, flake8, or black to enforce consistent style and formatting.
These tools catch syntax issues, unused variables, and formatting problems - so you don’t waste time in reviews saying “add a space here”.
Unit & Integration Tests
Run your full test suite with npm test, pytest, jest, mocha, junit, etc.
Failing tests block regressions - and protect your team from broken features sneaking through.
Security Scans
Use tools like npm audit, bandit, snyk, or trivy to detect vulnerable dependencies or insecure patterns.
These scans catch risks your team might miss - especially in large codebases.
Build Validation
Make sure your app still compiles or builds cleanly after the latest changes (npm run build, make, gradle build, etc.).
No one wants a PR that “worked locally” but breaks staging.
Type Checking / Static Analysis
Run tsc, mypy, pylint, or other type checkers and linters.
These surface deeper issues like type mismatches, bad imports, or unsafe code before humans ever get involved.
Once Pipelines are running, your PR will show the result of every check - pass, fail, or in progress - right in the sidebar.
How to Set Up Bitbucket Pipelines
Option 1: Use the Built-In “Set up Pipelines” Wizard
Go to your repo and click the Pipelines tab
Bitbucket will detect your tech stack
Choose a starter template (Node, Python, Java, Docker...)
Click “Set up Pipelines” to create the config file

This creates a working .bitbucket-pipelines.yml file in your root directory.
Option 2: Write Your Own .bitbucket-pipelines.yml
For full control, just create the config manually in your repo’s root.
Example: Node.js Project with Lint, Test & Build
This pipeline does four key things:
Installs dependencies
Runs lint checks (
npm run lint)Executes tests (
npm test)Builds the app (
npm run build) - validating nothing is broken
You can expand it to include security scans or test coverage reports if needed.
Can You Block Merges Until Pipelines Pass?
Bitbucket doesn’t force-block merges on failed builds by default. (It’s not included in the free plan)
But it offers a clean workaround:
Use: Allow automatic merge when all builds pass
This setting lets Bitbucket merge a PR only after the pipeline succeeds.
Here’s how to enable it:
Go to ‘Merge Settings’ as we discussed above.
Choose “Allow automatic merge when all builds pass”
This way, no one can jump the queue - and merges only happen once CI gives the green light.
Pipelines don’t just save time - they build confidence.
Your team spends less time reviewing broken code and more time reviewing better code.
Want to Take It Further? Let CodeANT Review With You
If you’ve made it this far, you already know how to do a solid review in Bitbucket.
But what if some of that effort - the repetitive checks, the overlooked edge cases, the security scans - could be handled automatically?
That’s where CodeANT fits in.
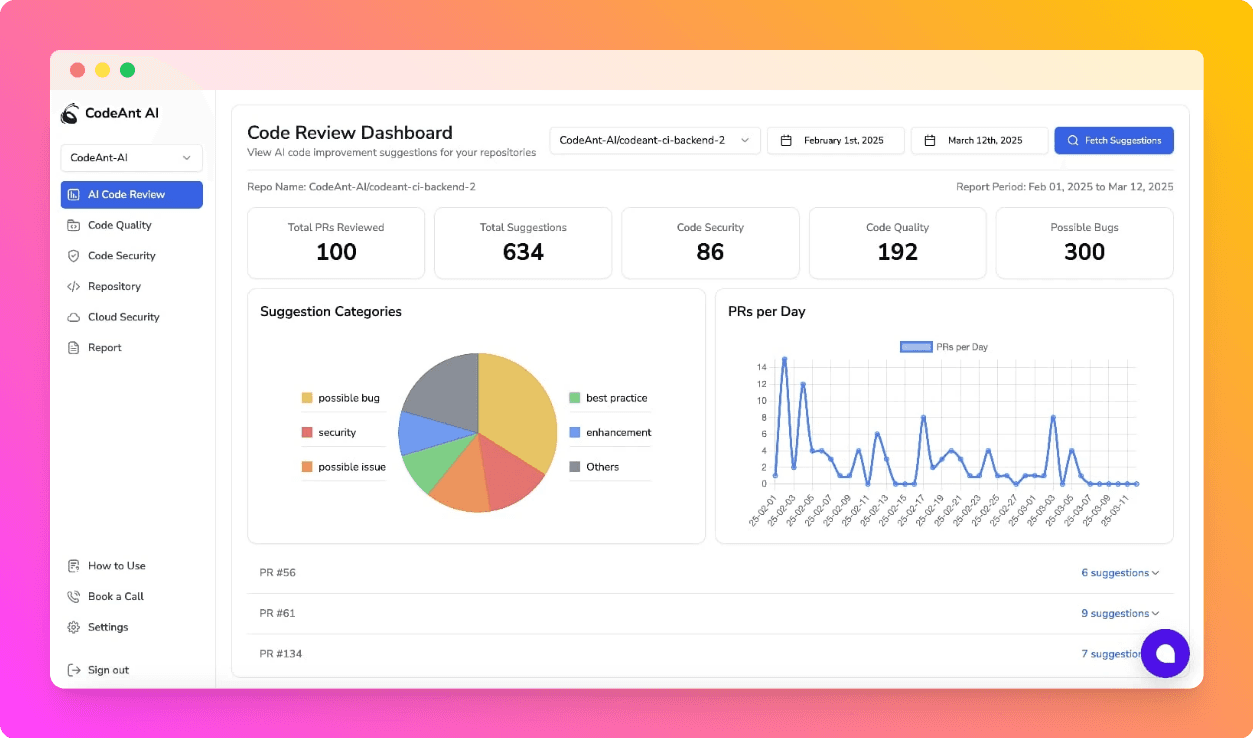
CodeANT for Bitbucket: Review Smarter, Not Slower
CodeANT is an AI-powered review assistant built to plug directly into your Bitbucket PRs.
It doesn’t replace human reviews - it just makes them faster, sharper, and more consistent.
What It Handles (Quietly, and Instantly):
Summarizes what changed and why in plain English
Flags logic bugs, dead code, duplication, and edge cases
Leaves clear, inline suggestions you can one-click apply
Runs static analysis, secret scanning, and IaC checks
Can block merges on serious issues (e.g., secrets, OWASP Top 10)
Generates audit-ready reports for SOC2, HIPAA, and more
Tracks tech debt, review speed, code quality, and bug trends across repos
All of this happens directly inside your Bitbucket PR view - no extra tools, no extra tabs.
Built for Real Teams
Define custom rules in plain English (like “all functions need docstrings”)
Works with Bitbucket Pipelines, CI, and merge settings
Install in minutes via Atlassian Marketplace
Configurable per repo or across your org
You write PRs like you always do - CodeANT just quietly makes them better.
Try It in Your Next Sprint
You’ve already got the review workflow down.
CodeANT simply adds the intelligence - helping you scale quality without slowing down.
Final Checks Before You Merge
Before you hit that merge button - pause for one last pass.
Even if the tests are green and approvals are in, a final check helps you catch what the bots (and sometimes humans) missed.
Pre-Merge Checklist:
All comments are resolved, not ignored
Any open tasks are completed
Required approvals are in
CI checks are passing
You’ve done a quick final scan of the full diff
You’re using the right merge strategy
Auto-delete branch after merge is enabled
This is the last chance to improve clarity, fix lingering nits, or just double-check intent. If it feels off, wait. If it feels clean - ship it.
PR Author’s Final Checklist
Here’s a quick self-check before you click merge. Copy it, paste it in your PR template, or just keep it in your head.
Merging code is easy. Merging well is a habit.
Wrap-Up: Good Reviews Make Good Culture
Code reviews aren’t just about shipping clean code - they’re about how teams learn, grow, and trust each other.
Bitbucket gives you the structure.
CodeANT gives you the superpowers.
You bring the thoughtfulness that makes it all work.
Review smarter by:
Automating what doesn’t need your brain
Focusing on clarity, intent, and correctness
Keeping your PRs readable, respectful, and scoped
Using feedback as a conversation, not a judgment
“The best reviews build better devs - not just better commits.”